- Detection - Measurement
- Force Measurements
- Bench-top force gauge and torque meter
- CLA Clinical Laboratory Automation SA
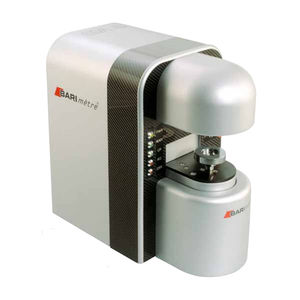
Bench-top force gauge and torque meter NEOvario manualelectronic
Add to favorites
Compare this product
Characteristics
- Type
- bench-top
- Other characteristics
- electronic, manual
- Torque
Max.: 1 Nm
(0.74 ft.lb)Min.: 0 Nm
(0 ft.lb)
Description
The NEOvario is a high-technology device, which is completely compact and integrated. The measuring devices will meet the demanding needs of torque and force measurement fields.
ACCESSORYS :
- Universal Digimes
- Universal sample holder for watch movement
- VARIOweight - Measurement standard
- Adjustable angular support
- Anti-vibration table
The NEOvario is a state-of-theart instrument geared for providing laboratory-precise measurements. Completely integrated and compact, this device will meet any and all your demanding needs in the field of force and torque measurements.
MEASURING PRINCIPLE
The workpiece to be measured is fixed on the spindle of the NEOvario by means of the available fixing tools (plate, clamps, chucks or universal support).
The centring of the axis of rotation of the workpiece to be evaluated and that of the NEOvario is done with the help of a magnification camera placed in the measuring axis. The sensor is then positioned in relation to the workpiece by means of a micro meter shifting table that allows three axes of movement: X, Y and Z.
Other CLA Clinical Laboratory Automation SA products
MEASUREMENT DEVICES
Related Searches
- Force sensor
- Strain gauge force transducer
- Aluminum force sensor
- Torque transducer
- Torque tester
- Small force sensor
- Electronic torque tester
- Static torque transducer
- Bench-top torque tester
- High-accuracy torque transducer
- Compact torque transducer
- Torque force sensor
- Bottle cap torque tester
- Custom-made load cell
- Automatic torque tester
- Manual torque tester
- Torque adjustment torque tester
- OEM torque sensor
- Bidirectional torque sensor
- Force gauge and torque meter
*Prices are pre-tax. They exclude delivery charges and customs duties and do not include additional charges for installation or activation options. Prices are indicative only and may vary by country, with changes to the cost of raw materials and exchange rates.


