- Metrology - Laboratory
- Metrology and Test Equipment
- Horizontal measuring projector
- Dr. Heinrich Schneider Messtechnik GmbH
- Company
- Products
- Catalogs
- News & Trends
- Exhibitions
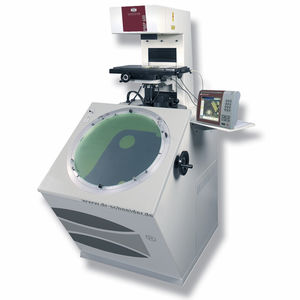
Horizontal measuring projector ST H seriesprofile


Add to favorites
Compare this product
Characteristics
- Options
- profile, horizontal
Description
Fields of application of horizontal measuring projectors
The measuring projectors with horizontal beam passage have a cross table with very high rigidity. Measurements are just as precise with a table load of up to 200 kg as with light workpieces. Mounts such as pointed jaw vices or rotation axes, manual, motorised or CNC, can be installed on the table with no problem at all.
Basic configuration of the ST 600 H - ST 1000 H measuring projectors
• 600 – 1000 mm projection screen with cross hairs, depending on version
• Template holder
• Goniometer 360° pivotable, vernier scale 1â??
• 3-lens turret for different lenses
• Measuring range: 350 x 300 mm up to 750 x 300 mm, depending on version
• Table area: 750 x 200 mm to 1200 x 200 mm, depending on version
• Swivelling measuring table for ± 20°, vernier scale 10â?? for the table sizes R350 and R450
• X, Y and Z axis in needle bearings
• Scales with a resolution of 0.1 µm
• Motorisation of all three axes and operation via joystick
• Transmitted light and incident light illumination
• Focusable incident light illumination
• M2 measurement software with edge sensor integrated into the beam path
Options
• Integration of a high-resolution CCD camera in the beam passage for documented and fast measurements
• M3 measurement software as intuitive entry-level package to image processing with geometric measurement functions
• SAPHIR measurement and analysis software for complex measurements
• CNC system for automatic measurement of the workpieces
• Expansion up to 5 axes for control of rotating table and rocker arm
Catalogs
Other Dr. Heinrich Schneider Messtechnik GmbH products
Projector
Related Searches
- Dr Schneider measuring system
- Dr Schneider optical measuring system
- Automatic measuring machine
- High-precision measuring machine
- Measuring system for industrial applications
- Parts measuring machine
- Distance measuring machine
- Non-contact measuring machine
- CMM
- Diameter measuring machine
- Video measuring machine
- Laser measurement system
- Dr Schneider 3D measuring system
- Compact measuring machine
- Multi-sensor coordinate measuring machine
- Length measuring machine
- CNC measuring machine
- Bridge coordinate measuring machine
- Calibration measuring machine
- High-speed measuring machine
*Prices are pre-tax. They exclude delivery charges and customs duties and do not include additional charges for installation or activation options. Prices are indicative only and may vary by country, with changes to the cost of raw materials and exchange rates.


