
- Products
- Catalogs
- News & Trends
- Exhibitions
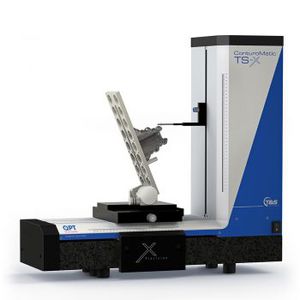
Contour measuring machine TSgeometrythreadhorizontal
Add to favorites
Compare this product
Characteristics
- Measured physical value
- contour, geometry
- Applications
- thread
- Configuration
- horizontal
Description
The geometrically unique, horizontal position of the probe arm enables the testing of contours and in holes of a diameter of under 2 mm, up to over 300 mm. Probe tip breakage is minimised through the integrated safety restriction of Z-axis movement. The possibility of roughness testing, provided by the integrated measuring force setting, can be used in combination with the contour test. Re-measuring is therefore unnecessary in many cases. Contour and roughness results can practically be determined in a single transit.
Further tasks which can be undertaken via the ConturoMatic TS include the testing of holes, distances from interior and exterior contours, threads, angle of taper, parallelism, formal errors, measurement of uninterrupted surfaces, without losing the absolute reference etc.
Robust mechanical basis
Large measuring range 250 x 320 mm (TS), 280 x 350 mm (TS-X)
Guide elements made of granite. The basis for the highest of guide accuracy
Integrated, motorised Y-variable table for automatic Zenit search (optional)
Motor-controlled measuring axes
Permanent, dynamic speed control. This leads to a constant data-point distance, regardless of the profile tilt
Contactless, incremental measuring systems. Our gauges behave like steel, from a thermal perspective. Temperature compensation or time-consuming climate control is therefore often unnecessary
Integrated control electronics
Data acquisition and control via standard interfaces, guaranteeing future-proofing and independence from changing computer hardware
No significant radius movement of the probe element
Horizontal position of sensing device, which is unambiguous at all times.
Related Searches
- Measuring device
- Measuring machine
- Portable measuring device
- Automatic measuring machine
- High-precision measuring machine
- Touch probe head
- Parts measuring machine
- Automatic measuring device
- Compact measuring device
- Measurement touch probe head
- Geometry measuring device
- Contour measuring machine
- Rugged measuring machine
- Standard
- Roughness measuring machine
- Horizontal measuring machine
- Measuring device with integrated screen
- Large part measuring machine
- Shape measuring device
- Position measuring device
*Prices are pre-tax. They exclude delivery charges and customs duties and do not include additional charges for installation or activation options. Prices are indicative only and may vary by country, with changes to the cost of raw materials and exchange rates.


