
- Company
- Products
- Catalogs
- News & Trends
- Exhibitions
1-axis inclinometer BlueSYSTEM SIGMAdigitalcapacitivehigh-precision


Add to favorites
Compare this product
Characteristics
- Number of axes
- 1-axis
- Output
- digital
- Technology
- capacitive
- Other characteristics
- high-precision, portable, wireless, with LCD display, high-resolution, temperature-compensated, with digital display, for angle measurement, for the construction industry
- Inclination
Min.: -1 grad
Max.: 1 grad
- Resolution
0.00005 grad
Description
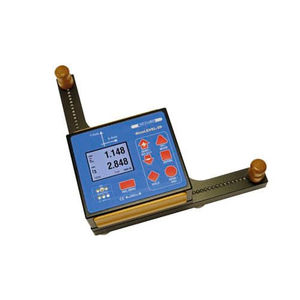
BlueSYSTEM Sigma, the perfect inclinometer for measuring straightness, flatness, squareness as well as machine geometry
The BlueSYSTEM Sigma is the perfect measuring instrument to align machines and – together with the wylerSPEC software – for the measurement of straightness, flatness, squareness as well as machine geometry and machine rotations. BlueSYSTEM Sigma combines high accuracy (0.001mm /m = 0.2 arcsec) with the robustness required in the machine tool business. The user-friendly wylerSPEC software enables users to achieve the required accuracy of their machine and to record it afterwards.
A BlueSYSTEM Sigma normally consists of two BlueLEVEL measuring instruments. Depending on the application – e.g. for the alignment of machines - a BlueMETER Sigma display unit is required. If the instruments are used together with wylerSPEC software, they are directly connected to the laptop via the wylerCONNECT.
For the most important and most typical applications, we put together several BlueSYSTEM Bundles. This simplifies choosing the optimal set for your application.
Some examples of applications with instruments of the BlueSYSTEM family in combination with the WYLER software wylerSPEC.
LINES / PARALLELISM
Measurement of straightness and parallelism
LINES / PARALLELISM with TWIST
Measurement of straightness and parallelism with twist
PERPENDICULARITY
Measurement of perpendicularity on machines or a granite measuring square
CIRCULR PATHS and CIRCULR PATHS WITH TWIST
Measurement of ring-shaped overlays consisting of one or two rings – with or without twist
VIDEO
Catalogs
Exhibitions
Meet this supplier at the following exhibition(s):

Related Searches
- Tilt sensor
- Digital tilt sensor
- Dual-axis inclinometer
- Multi-axis inclination sensor
- Analog tilt sensor
- Single-axis inclinometer
- High-precision tilt sensor
- Rugged tiltmeter
- Angle measurement tilt sensor
- High-resolution tilt sensor
- Tilt sensor with aluminum housing
- Inclinometer for the construction industry
- Capacitive inclination sensor
- Mechanical tilt sensor
- Portable inclinometer
- Wireless inclination sensor
- Temperature-compensated inclinometer
- Inclinometer with LCD display
- Inclinometer with digital display
- Adjustable tilt sensor
*Prices are pre-tax. They exclude delivery charges and customs duties and do not include additional charges for installation or activation options. Prices are indicative only and may vary by country, with changes to the cost of raw materials and exchange rates.


